Taking snapshots with Noran confocal software


Lab Home -- People -- Experimental facilities -- Publications -- Experimental pictures -- Links

Converting Noran files to snapshots (TIFF or GIF images):

  1. Take your image using normal methods: for a 2D image, you probably want medium resolution, perhaps with some jump averaging to improve the image quality. You want to take 1 image (not a sequence) usually, although the methods below will work to grab some pictures from a sequence of images.

  2. On the SGI computer, under the Toolchest, go to Intervision-->2D Analysis to start the 2D Analysis program.

  3. In that program, go to File-->Open and load in your data file

  4. You want to make the image pretty:
    • View-->Display Color Bar (turn option off)
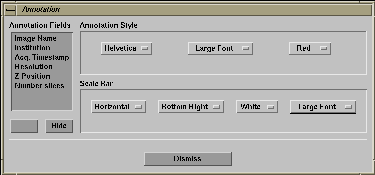
    • View-->Annotation (set style to Helvetica, set Small Font to Large Font in both places, hit Dismiss -- see image at right
    • View-->Display Scale Bar (turn option on)
    • If you don't like the scale bar, use the Annotation window to change its location, color, etc.
    Annotation Window

  5. If you want, you can change the brightness and contrast, or zoom by using the two icons at the upper left of the 2D Analysis window. See picture at right.
    • Brightness/Contrast: Click on the left one, put your mouse over the image, hold left mouse button down, move up or down to change contrast, move left or right to change brightness. Right-click to restore to original quality.
    • Zoom: Click the 2nd icon from left, use left mouse button to pan, middle mouse button to zoom, similar to acquiring data. Right-click to restore original pan/zoom settings.


    Brightness/Contrast

    Pan/Zoom

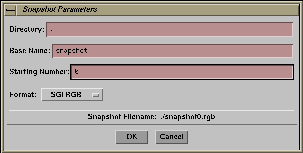
  6. Save the image using: File-->Snapshot.
    • Change SGI RGB to TIFF-8 bit
    • The image will be saved with the name snapshot0.tif unless you change it. A limitation is that you always have a string and a number (in other words blah57.tif is OK but blah.tif won't work). However you can change both the string and the number.
    • NOTE: Do not save image using "Save As." This does not create a TIFF file.

  7. Transfer the image to a Linux computer (ie pizza.physics.emory.edu), using ftp from pizza:

  8. When done, exit 2D analysis: File-->Exit. It will tell you that you have changed your data and ask you if you want to save the changes; click "Don't Save".

  9. On your Linux computer: use "xv" to convert to GIF:

  10. Note that you can use the "3D Analysis" program on the SGI computer to prepare 3D snapshots.

Notes:


For more information, please contact Eric Weeks: <weeks(at)physics.emory.edu>